First Clinker Plank.

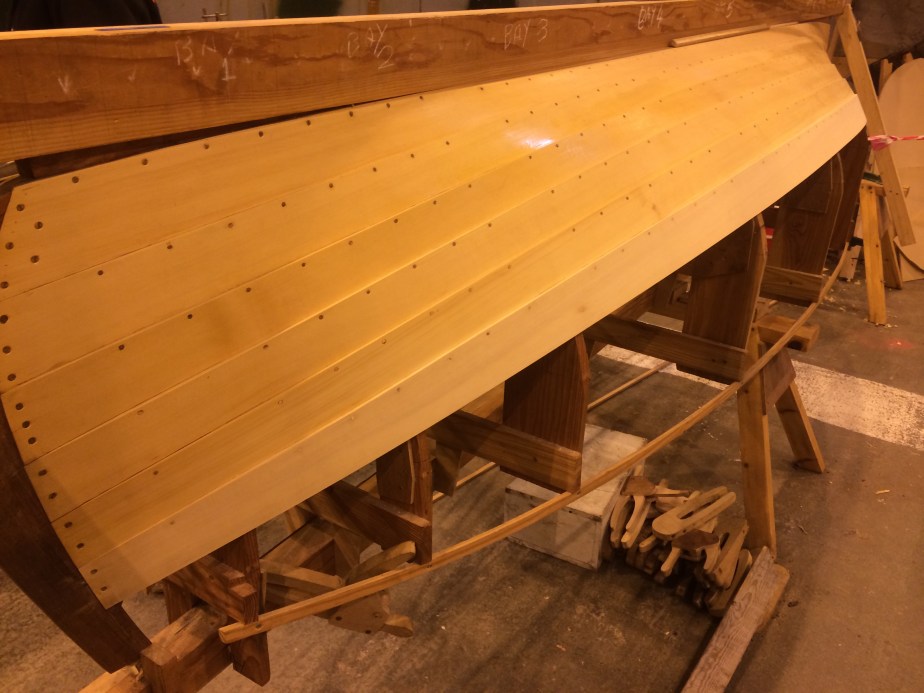
This was carried out on our Adirondack guide boat, on which students are allowed one strake each.

Forgive the yellow cast of the photographs, the lighting in boathouse 4 is wanting in the depths of winter. This is compounded by the fact that the wood used is yellow cedar. A wonderfully durable, fragrant wood that is a joy to work.

Careful spiling and scribing, and the rolling bevel required to make the land a perfect fit was straightforward enough. Cutting the joint for the ends, called Geralds and Back brows was something I got really into, of course I had a couple of practise runs before going for it for real. I’m very pleased with the result and look forward to more clinker planks on a different vessel in the new year.

IMG_2246

Victory Class. Mould set up.

Following on from lofting, I was introduced to the magic of picking up moulds, making them and setting the whole lot up true to produce the shape of a vessel, onto which she will be built. Pictured here is a rebuild of our victory class design, Simba.

This was another team learning exercise, and one I found simple to grasp. The use of down-shores was a particular breakthrough in our understanding, as it helped simplify the horning process considerably. The use of battens to begin to define the strake lines is a process which is at once simple, and subtle. My mould is pictured before installation of the cross spalls that define the waterline and deck line.

Lofting.

Without doubt a most fascinating process. Taking a Chappelle designed dinghy, I worked with a team of colleagues for a week to learn the principles of lofting, and then for several early morning sessions  I discovered an affinity for this incredibly useful process. I took the exercise much further, creating our own stations and diagonals, more sections of rabbet lines around the stem, and culminating in working up expansions of a raked and radiused transom.

There are several more lofting projects in the pipeline at IBTCP and I am looking forward to learning even more. Lofting is useful. With simple pencils and nails, tick-sticks and battens, and a methodical approach, it’s possible to calculate the exact dimensions of any and every part of a given vessel. Absolutely brilliant.

Bucklers Hard.

Included for the sake of completeness is an image of my efforts at traditional 18th century woodworking techniques, undertaken during a field trip to Bucklers Hard. I learned about the use of felling axes, the broadaxe, and various adzes. It was incredibly hard physically and I found this enjoyable in a perverse way, but also I discovered a really useful introduction to alternative ways of working wood. Working this great big Douglas fir log took me three days, just to achieve one flat face!IMG_1969

More oars.

This time made specifically for the dartmouth gig. Much longer than my first oar, significantly tapered, and with a hollowed loom. I made one, to match oars made by colleagues for my city and guilds exam. It is made from douglas fir, with spruce flukes.

Again, it was a hugely satisfying exercise in feel and symmetry, but this time working to very specific dimensions taken from plans and formers, but more significantly measured from oars that my colleagues had already completed. The cigar shaped tapered hollow was made with a gouge chisel.

In the photographs of two finished oars together, mine is the one on the right. And I couldn’t resist the star motif on the handle end which has become a sort of makers mark.

I really enjoyed the leatherwork as well. Stitching up was a beautifully meditative exercise.

Lilian. Transom and Fashion pieces.

Lilian’s new transom was a project that was begun by another student, he had made up and cut the blank from oak. It became my task to figure out and cut the bevels, and to make fashion pieces from grown oak to fit. The original stern knee was tremendously warped but somehow I managed to take a bit off here and there to make it acceptable again. Bolting the assembly into position was undertaken by my colleague Andy. Incidentally, in the photograph of the transom temporarily up on it’s A frame, you can see the starboard rubbing strake in the plastic bag about to be steamed to fit.

Lilian. New Rubbing Strakes.

This proved to be another of my too-busy-enjoying-the-work-to-photograph moments.

I made a pair of new rubbing strakes for Lilian of oak with an half egg shaped profile, scarfed just aft of midships. The scarfs were glued up on the bench, and the resulting eight metre lengths were steamed into place on the vessel in one big operation utilising the ‘boil in the bag’ method. You can see one of the finished rubbers in the big side view picture below, and also in one of my header pictures which shows a recent image of Lilian being lifted.

Lilian. Putting her back in shape.

This nearly foxed me for a while. Lilian is a carvel built open motor launch, about 7 metres long, and was in a terrible state. She had been lying on her side for some time before she came to college to be rebuilt, and this meant that she was terribly misshapen. She was severely flattened all along her starboard side, and for a while seemed determined to stay that way. I put in a centreline and began horning from this to establish a better shape with the use of a couple of stiff battens around her sheer to help.

Then I reworked her grown floors and futtocks. Starting at the stern and working forward. Some had been made by other students, I made or heftily altered and refitted the rest. None had been fixed into place so I gained experience of making up and fitting keel bolts and the bolts to hold lower and upper futtocks together. What isn’t the pictures are the large A frames that we eventually installed to hold the stem and stern plumb. Five sets of frames later and she was back in shape, and ready for the next step.

The Dartmouth Gig. Risers and Thwarts.

Out of the strongback and all timbered up, it was time to start fitting out. My task was to fit risers, and learned that a hefty rolling bevel to the back was needed to fit. In order to make them aesthetically pleasing my tutor, Jim Brooke-Jones explained that at all costs ‘the blob’ must be avoided. ‘The blob’ translates as just rounding things over willy-nilly. Therefore the face of the risers follow a thumbnail profile, curved face but with hard edges.

I also learned that lightening the risers fore and aft where less strength is required is a fine thing to do. So the risers lose both siding and moulding gradually over the last two and a bit feet at each end.

Made of oak and lightly steamed, they are held in place with silicon bronze screws at each timber, the heads of which are carefully plugged. The plugs are held in place with thick yacht varnish.

There are two schools of thought regarding thwarts. Fit absolutely perfectly to hull sides, or fit with a deliberate gap. After some deliberation we settled on the former as it was more technically challenging. I fitted all three thwarts, made of sapele and lightened their edge by a quarter inch by means of a bevel cut into the underside. I reckon the fit is pretty perfect, a challenge as I had to incorporate the fit to a lap of clinker planking and rove heads on each thwart end, and I very much enjoyed this task.

The Dartmouth Gig. Shaping the stem.

I did this in two stages, one tentative, and then with inspiration from our head of teaching, Bob Forsyth, I weighed in and finished the job properly.

The first stage was based on what I knew of stem shapes looking around me and left the stem head square. The second stage took me into fine boatbuilding territory and resulted in a shape that I’m very pleased with.

I’m working on a brass fleur de lis that will crown this, pictured here is a first experiment in how to do it, the real one will be much better.